How to Remove Filler Words From a Podcast: Automatic vs Manual, Costed
Three routes to an um-free episode, worked against one month of raw audio, and why you should keep a few.
To remove filler words from a podcast, you have three routes: a transcript-based editor that finds and cuts them for you (Descript's "Remove filler words"), an upload service that does the same pass on a finished file (Cleanvoice's Filler Words Remover), or doing it by hand in a free editor like Audacity. The automatic routes are fast but metered; the manual route costs nothing but time. Whichever you pick, don't cut every "um". A show with all of them removed sounds edited in a way listeners notice, and the goal is a conversation that flows, not one that's been sanded flat.
This guide is for anyone editing their own talk show or interview podcast. Skip it if your episodes are scripted and read, because the fix there is the script, not the edit. Allowances below are as of 9 Oct 2026, read from each vendor's own pricing page.
Why cutting every "um" sounds wrong
Filler words carry more than hesitation. They mark where a speaker is thinking, they hold the floor in a conversation, and they set the rhythm of a voice that listeners have learned to trust. Take every one out and three things happen. Sentences start to butt into each other with no air between them. Breaths land in odd places, because the breath that came before the "um" is now glued to the next word. And the speaker sounds faintly rushed, as if they'd been told to hurry.
The useful distinction is between fillers that block meaning and fillers that carry it. A string of "um, so, like, um" before a simple answer blocks it, so cut it. A single "um" before someone admits something hard, or before a joke lands, is doing a job. Leave it. That judgement is why fully automatic removal is a first pass, not a finished edit.
A method for deciding what stays
Listen to the first five minutes of the raw episode and mark every filler you'd cut on instinct. Then go back and ask one question of each mark: does the sentence mean the same without it? If yes, it goes. If the pause was the point, it stays. You'll end up with a personal rule for each regular voice on the show, and that rule is what you check the automatic tools against afterwards.
Automatic tools: how they detect and cut
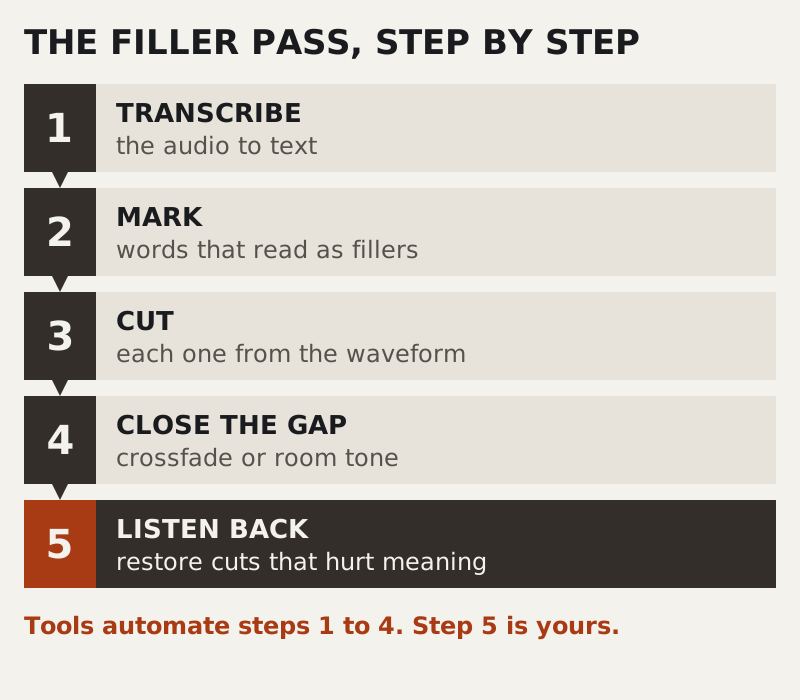
Every automatic filler remover runs the same basic chain, whatever the brand says on the box. It transcribes the audio, marks the words it recognises as fillers, cuts each one out of the waveform, and then has to close the gap it left behind. That last step is where tools differ most and where most of the artefacts come from.
Descript: from the transcript
In Descript, "Remove filler words" sits in the AI Tools panel in the right sidebar. It works from the transcript, so you see the fillers it found as words on the page, and it only works on English transcripts. On current plans it uses AI credits. Descript Free includes one hour of media a month and 100 AI credits, given once rather than every month, and lists Remove Filler Words as "Limited". Hobbyist and the plans above it carry the full feature.
Cleanvoice: upload and get a file back
Cleanvoice works on the finished recording. You upload, it removes filler words and can also take out background noise, echo and reverb, and you download the result. New accounts get 30 minutes of credit on sign-up with no card, which is a one-off allowance rather than a monthly one. Its paid plans are sold by hours of audio; check the pricing page for current amounts, because we couldn't confirm the US prices on the day we read it.
The worksheet: one month, three routes
Monthly allowances only mean something against your own schedule, so we use the same assumptions our cost-per-episode worksheet prints: four 60-minute episodes a month, with about 1.5 hours of raw audio recorded per episode. That's 6 hours of raw audio a month to run through a filler pass.
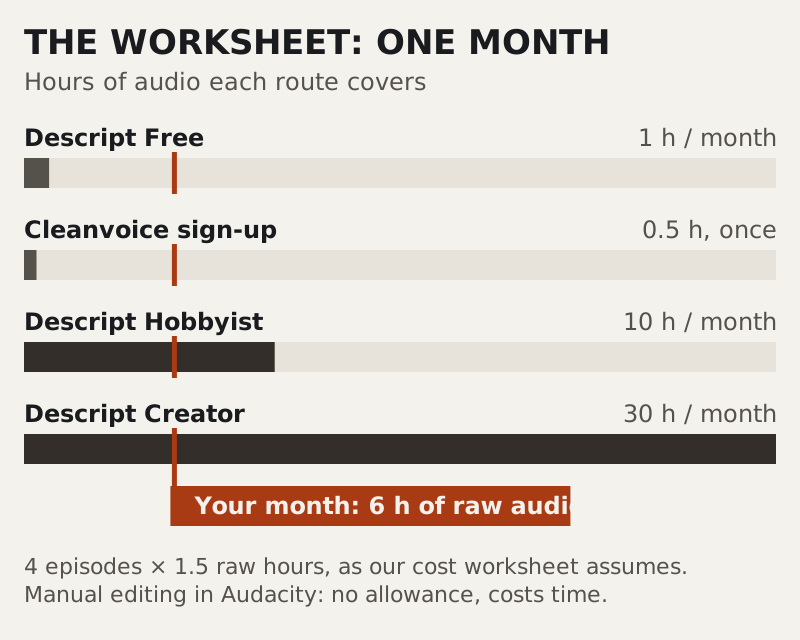
- Descript Free: one hour of media a month covers a sixth of that month, and the filler tool is marked "Limited" on this plan. It's a way to find out whether transcript editing suits you, not a way to run a weekly show.
- Cleanvoice's sign-up credit: 30 minutes, once. That's a third of one episode's raw audio. Use it on the noisiest segment you have, so the test tells you something.
- Descript Hobbyist: 10 hours of media a month covers the 6-hour month with room to spare. The filler tool also draws on AI credits, of which Hobbyist gets 400 a month.
- Manual in Audacity: no allowance and no bill. The cost is your time, which depends on how many fillers your guests use, so measure it instead of guessing.
The manual line is the one most guides skip, so here is the arithmetic we'd use. Count the fillers you'd cut in a five-minute sample of a typical episode. Time yourself cutting them cleanly. Multiply that time by the number of five-minute stretches in your raw audio, which is 18 for a 1.5-hour recording. The answer, compared with what an automatic plan costs you, tells you which route is cheaper for your show, and nobody else's numbers can tell you that.
Trim before you upload
Metered tools measure what you send, not what you publish. A 1.5-hour raw file costs half again as much allowance as the hour-long episode it becomes. Cut the false starts, the pre-show chat and the "can you hear me" check first, then run the filler pass on what's left.
The manual method in a free editor
Audacity costs nothing, its code is open, it runs on Windows, macOS and Linux, and version 4.0.1 is current. It has no filler detector, so you're doing the transcript's job by ear and by eye. Fillers are easy to spot on a waveform once you know the shape: a short, even block of sound, often sitting between two longer phrases, with little of the shape of a consonant at either end.
- Play at normal speed and mark, don't cut. Drop a label at each filler you plan to remove. Cutting as you go breaks your listening, and you'll make worse decisions.
- Zoom in before each cut. Select the filler plus the tiny gap on one side of it, never both gaps, so the speaker keeps one natural breath of space.
- Cut where the waveform crosses the centre line. A cut in the middle of a wave produces a click. Starting and ending your selection where the line crosses zero avoids it.
- Keep a clip of room tone. Copy two seconds of the room with nobody talking, from the start of the recording. If a cut leaves dead digital silence, paste room tone in its place so the background doesn't drop out.
- Listen back at the end, not during. One pass at normal speed through every cut catches the edits that changed the meaning.
Recording habits that cut fillers at the source
The cheapest filler is the one nobody said. Most of them come from people thinking out loud under pressure, so the fixes are about taking the pressure off before you hit record. Send guests the first two or three questions in advance, so their opening answers don't start from cold. Tell them, out loud, that pausing is fine and silence will be edited, because many guests fill silence on purpose to stop the conversation feeling stuck.
For yourself, keep short bullet notes rather than a script, since reading sounds stiff and improvising from nothing fills with "um". Record a second take of the intro and outro, which is where hosts stumble most. And when you catch a run of fillers mid-sentence, stop, leave two seconds of silence, and say the sentence again. A clean restart with a gap in front of it is the easiest edit in the whole episode.
Our guide to podcast audio editing in the right order puts the filler pass after cleanup and levels, for one reason: the noise work changes what a cut sounds like, so you want to make your cuts on the cleaned audio.
Edge cases
Interviews in another language
Descript's filler removal works on English transcripts only. For a show in another language, plan on Cleanvoice or the manual route, and check Cleanvoice's own documentation for the languages it supports before you pay.
Crosstalk over a filler
When the guest says "um" while the host is talking, cutting it from a single mixed track takes the host's words with it. Record a separate track for each speaker, which our remote recording guide covers, and the filler comes out of one track without touching the other.
Video podcasts
Cutting a filler from a video cuts the picture too, and a jump in the speaker's face is far more visible than a gap in the audio. Remove fewer fillers in video, or cover the cuts with a cutaway or a wider shot.
Questions we get
How do I remove filler words from a podcast automatically?
Use a tool that transcribes and cuts for you. In Descript, run "Remove filler words" from the AI Tools panel on an English transcript. In Cleanvoice, upload the recording and download it back with fillers removed. Then listen through and put back any cut that changed the meaning.
Is there a free filler word remover?
Not a fully free one with no limits. Descript Free lists the feature as "Limited", with one media hour per month and a one-off grant of 100 AI credits. Cleanvoice gives 30 minutes of credit once, at sign-up. The only route with no cap is removing them yourself in a free editor like Audacity.
Should I remove all filler words from my podcast?
No. Cut the ones that block meaning, such as a run of fillers before a simple answer. Keep the ones that carry it: the pause before a hard admission, or the beat before a punchline. A show with every "um" removed tends to sound rushed and over-edited.
How do I remove "um" from audio in Audacity?
Mark each one first, then zoom in and select the filler plus the gap on one side only. Start and end the cut where the waveform crosses the centre line to avoid clicks, and paste in room tone if a cut leaves dead silence. Listen through once at the end.
How much does it cost per episode?
On our assumptions of four 60-minute episodes a month and 1.5 raw hours each, you need 6 hours of audio processed a month. Descript Free covers one of them; Descript Hobbyist's 10 hours cover all six. Paid prices change often, so read each vendor's pricing page on the day you buy.